Replacing a toilet seat is one of those things that you never think about having to do.
If you’re renting, your landlord probably does it. If you own your own home, however, you’re on your own.
Well, you’re not completely on your own. We’re here to give you a helping hand!
No products found.
In this article, we’re going to walk you through the process of removing your old seat and installing your new seat.
It’s an easy job that should take about 10 minutes tops, no need to call on a plumber for this one! In fact, you’ll probably spend longer reading this article than actually doing the job!
What You’ll Need
Usually, the fitting hardware for your new toilet seat is supplied with the seat. That’s why we haven’t included it on this list.
That being said, you will need:
- Wrench
- Screwdriver
- Cloth
- Cleaning solution
- Hacksaw (extreme cases)
When it comes to the wrench, an adjustable one is best as you don’t need to faff around trying to find the right size. If you don’t have a wrench, then a pair of pliers will do just fine.
The screwdriver should be a flat head screwdriver. You’ll want a fairly large screwdriver as the bolts are pretty big.
The cloth and cleaning solution is optional; however, we recommend giving the area around the fitting holes a good clean when the bolts are out.
The hacksaw you’ll only need if the bolts are corroded and therefore difficult to unscrew. Or if your bolts are incredibly long.
Removing the Old Seat
- If the seat has quick release hinges, open them, and remove the seat and lid. This will make the process easier.
- If your seat has bolt caps these will need to be opened or removed. Bolt caps are covers that sit on top of the hinge and the bolts. Use a screwdriver to open or remove the caps.
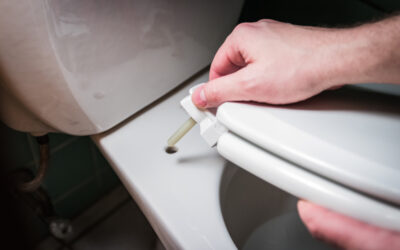
- Look underneath the toilet for the nut. This is the thing that the bolt has gone through. It should be pressing against the porcelain.
- Use your wrench or pliers to loosen the nut by turning them counterclockwise. You may need to place the screwdriver into the top of the bolt to hold it in place as you turn.
- Once loose, you can use your hand to finish unscrewing the nut and remove it from the bolt.
- Lift the old seat up and away from the toilet pan. The bolts should come free easily. If they’re particularly old, you might need to give them a bit of a wiggle.
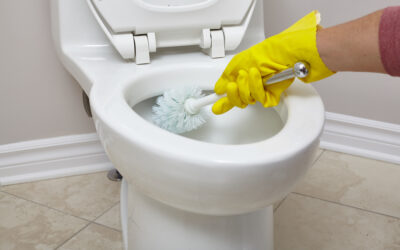
- Use the cloth and the cleaning solution to clean the fitting holes and the rim of the toilet pan.
Troubleshooting
If the bolts are old and corroded by rust or grime, you might have trouble working the nuts and bolts free.
The first thing you want to try is WD-40 or other liquid lubricants. Spray the threads above and below the nut then let it sit for a few minutes.
If the lubricant doesn’t work, use your wrench to hold the nut and your screwdriver to turn the bolt from the top.
If they’re really stuck, place the hacksaw under the toilet bowl and above the nut. You might need to do a bit of wiggling to get it in.
Saw through the bolt until it drops away. If you’ve got metal bolts, this could take a while.
Installing the New Seat
- Remove the seat from the packaging and locate the bolts and nuts. Sometimes they are loosely tightened onto the hinges, other times they are in a separate bag. If they’re attached, remove the nuts from the bolt and set aside.
- Place the bolts through the fitting holes on the seat and the toilet. The seat should gently rest in place at this point.
- Check that the edge of the seat sits on the edge of the toilet bowl.
- With some toilets, the fitting holes are oblong to allow you to draw the seat forward or push it back to fit better. Adjust the seat, so it fits flush with the edges, then place a hand on the seat to keep it in position.
- Thread the nut and any washers onto from underneath. You should be able to do this by touch but if you’re struggling, have a look below.
- Hand tighten the nuts as much as you can on each side.
- Use your wrench or pliers to finish tightening the bolts. They need to be as tight as you can get them so that the seat doesn’t slip around. You may need to use the screwdriver to hold the bolt in place for this part.
- If the seat comes with bolt caps, you’ll need to put them in place and push down till you hear them click into place.
Quick Release Seats
With these seats, you don’t put the bolt through the hinges before dropping it into the fitting hole. Instead, you snap the seat onto the bolt once the bolt is in place.
Make sure to read the instructions for these carefully. Each model has its own mechanism with its own trick for fitting in place.
Troubleshooting
The main problem people run into is a wonky seat. This usually happens when you fully tighten one side before the other.
It’s always best to hand tighten both to the same level so that the seat stays in the correct position. You can then go back and finish up with the wrench.
Another issue you might have is with the lid not staying open. This happens because the seat has been installed too close to the tank. If you can move the seat forward without ruining the edge alignment that will fix the problem.
If you can’t move the seat any further forward, you might want to look for a new seat, unfortunately.
Final Thoughts
There you have it, a few simple steps and your new seat is ready to go!
Remember to check the manufacturer’s instructions as well as this guide before you start the installation. Just in case they have special requirements.
No products found.